
CONTROLLERS BRUSH OPTIONS
TOOLS OVERVIEW
PANELS OVERVIEW
IMPORTANT HOTKEYS
iPAD verson features
Script recording/playback
VIDEO TUTORIALS
BRUSH OPTIONS
Size – Size of the brush (gauge of dash)
Opacity – Opacity of color. For round non bristle brush, it is recommended not to use maximum value for best effect of Antialiasing
Transparency - clarity of color.
Difference between Opacity and Transparency: 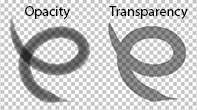
Color amount – mixing color. The less amount, the more mixing.. If you are fixing brush for full or partly mixing color it is recommended not to use maximum amount, as option is very sensitive
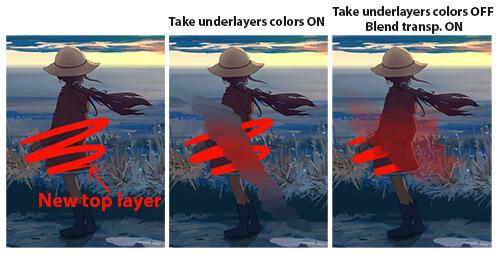
Take underlayers color checkbutton
Blend Transp. checkbutton – mixing channel of transparency (does not work for bristle brushes. Can not be turned on with option «Take underlayers color». If it is turned on, option «Transparency» does not work)
Extendtion – option fixex how long mixed color follow the brush. If you set it on 100 – color will follow forever. Recommended amount for basic brush is from 0 to 90, and for bristle brush from 40 to 90.
Option depends on Color amount set. If you don not use option “Color amount”, “extendtion” does not take an effect.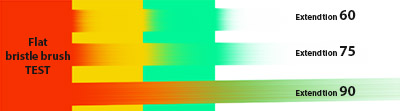
Stabilizer – delay between drawing of dash and movement of brush. It is used for drawing straight lines
Spacing – distance between two dots of dash. (depends on “size brush”)
Fixation checkbutton - cancells dependence from size of brush. If it is turned on, spacing works as actual distance between pixels. It is recommended to turn on only for flat bristle brushes, as it can make your computer capacity goes down.
Scatter – dispersion dots of dash
Scat. density - multiplier of “scatter”
Both axis checkbutton – disperse to X and Y. If turned of, dispersion goes to Y concerning angle “Angle 1”(parameter «Angle 1» influence rotation angle of dash points).
For more information watch this video
Angle 1 - rotation angle of dash form
Angle 2 – additional rotation angle. For example, you draw grass, and you want grass both to be rotated in depend of dash way and to be rotated in 90 degrees. You need to set «stroke direction» in «Angle 1», and in «Angle 2» set amount 90. In other words these two “Angles” adds between.
SqueezeX – compression of brush form horizontally.
SqueezeY - compression of brush form vertically.
Dirty mode – turns on dirty brush mode. Remembers mixed color of previous dash (works only with «Color amount»)
Preserve main color – saves main color of brush, dirty mode influences only on «Color amount»)
Dirty strength – amount of brush dirty.
CAUTION! THIS PARAMETER IS VERY IMPORTANT FOR DRAWING IN OILY STYLE. It is recommended to watch video with instructions.
Gradient:
Gradient of three types:
1) Stroke – spreads gradient colors along brush stoke.
2) Radial - spreads gradient colors round form of brush.
3) Linear - spreads gradient colors from left to right by form of brush.
Controller Gradient sets dynamics of gradient colors spreading down of the stroke, if «use stroke gradient» is set. If «Use radial» or «Use Linear» is set, controller determine strength of gradient effect.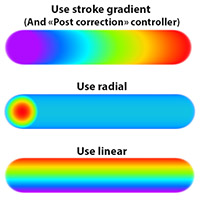
Villus diff. – adds effect textured bristle brush. Does effect with main color (not mixed)
Use texture checkbutton– turns on texture effect.
For choosing texture click on :![]()
Rand offset checkbutton – offsets the texture coordinates with random amount with every new stroke
Rand offset checkbutton – scales the texture with random amount with every new stroke
CONTROLLERS BRUSH OPTIONS
Adjustable settings of the brush can depend on the following:
 |
The pressure of the stylus on the tablet In order to change the setting, click on the icon: You can choose a preset setting or a manual setting. |
 |
Horizontal angle between the stylus and the tablet surface. Mostly used for the setting “Angle”. |
 |
Vertical angle between the stylus and the tablet surface. Mostly used for the setting “Angle”. |
 |
The angle of the stylus spinning around its axis. Mostly used for the setting “Angle”. A SPECIAL STYLUS “ARTPEN” IS REQUIRED. |
 |
The angle of the brush stroke direction. Mostly used for the setting “Angle”. Since it doesn’t depend on the stylus position, this setting is suitable for drawing with the mouse. |
 |
Speed of stylus movement during drawing. Standard setting for this option: |
 |
Random value. Standard setting for this option: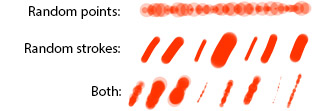 Meaning “even distribution” (follow this link for more details about random value settings). Random Points – random value for each new point in the brush stroke Random Strokes – random value for each new brush stroke Range Controller determines the range for random values (by default any number from 0 to 100 can be picked) |
 |
Gradual modification of adjustable settings Scale – the scale (length) of transition (depends on the maximum brush size) Sequence – repeats transition pattern from start to finish after completion Pressure scale – length of transition depends on the stylus pressure Random scale – random length of transition (random value picking depends on the Random Value setting, see above) Speed scale – length of transition depends on the speed of stylus movement |
 |
After brush stroke is completed, recreates it again according to the setting Unlike transition setting, this setting is automatically distributed along the entire length of the brush stroke ATTENTION! IF THIS OPTION IS INCLUDED AT LEAST IN ONE BRUSH SETTING, THE BRUSH STROKE WILL BE RECREATED |
 |
Determined by the position on the surface created by the perspective guides |
TOOLS OVERVIEW
MAGICWAND tool and FIIL tool ![]()

PANNELS PAINTER tool ![]()
You can use this tool for coloring pannels. It works on buttons, sliders, panels background, brushes.
ERASER tool ![]()
Switches to the last selected brush in the erasers category
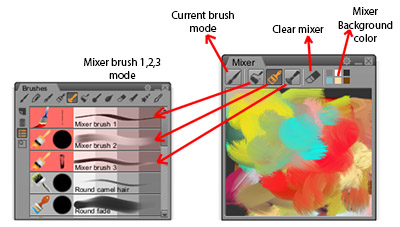
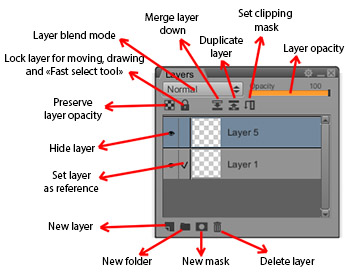
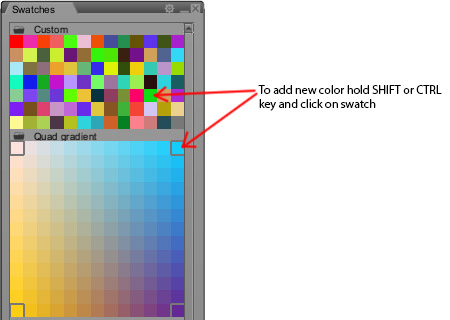
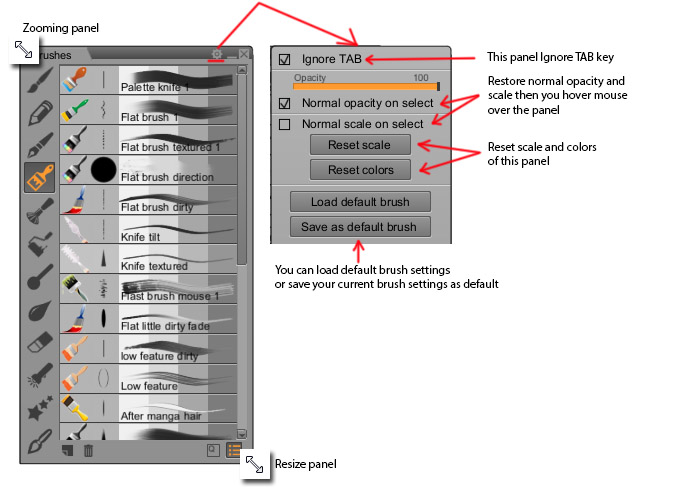
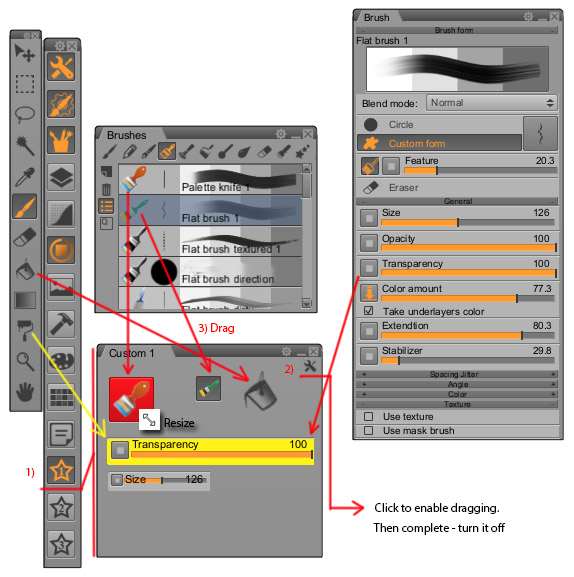
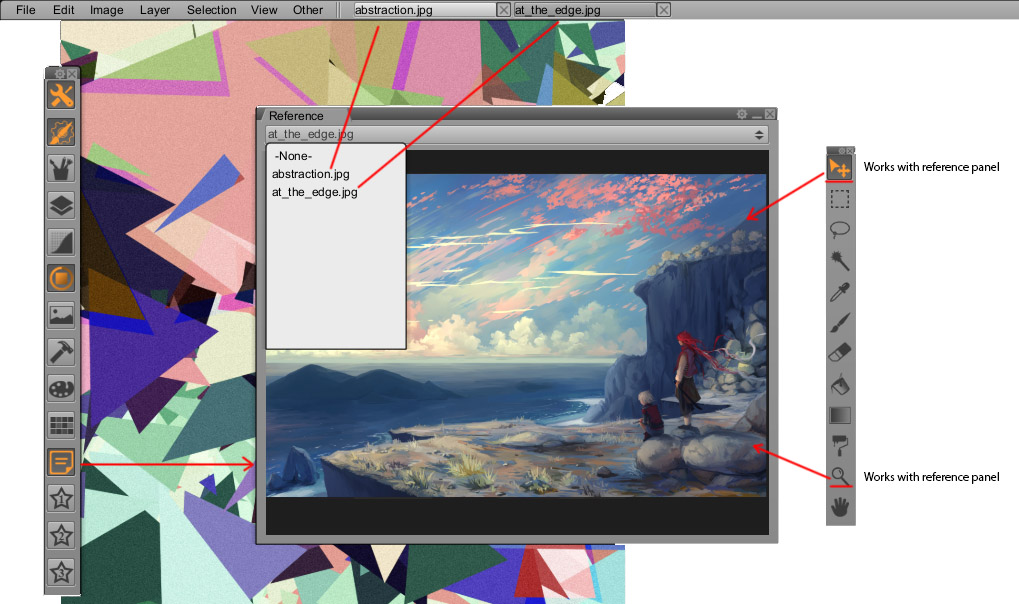
PANELS OVERVIEW
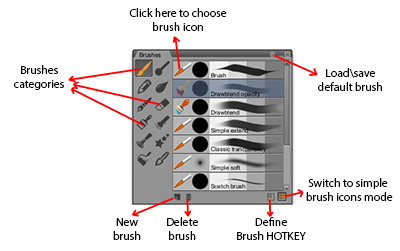
Brushes
Mixer
Layers
Swatches
Panel settings
Custom panel
Reference

IMPORTANT HOTKEYS
ALT+CTRL - Fast pick second color
SPACE+CTRL - Fast smooth zoom tool
ALT+SHIFT - Pick area color for bristle brush (each villus takes its own color from canvas)
F - Loads the main color of the brush while drawing
SPACE+ALT - Fast rotate canvas tool
SPACE+SHIFT - Fast preview (temporarily hides the panels and centralizes canvas)
SPACE+A - Fast layer selection tool
CTRL(on pannels) - Fast controler disable (hold CTRL and click on on the desired option)
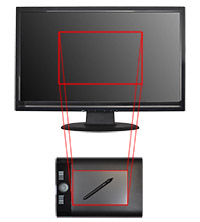
Q - Swap tablet from region to fullscreen (for example, if you have small tablet you are likely to use a small area as in the picture below... This hotkey switches to fullscreen and back)
iPad features
Saving your work to PC
Connect your iPad to PC. In iTunes select "Apps", find "Paintstorm" and click on it - you will see all created files, and you can save it to your PC.

Script recording/playback:
Recording Mode:
To start a script record press the red "record" button. The following functions are not available while script is in process:
- Create and open new documents
- Switch between open documents
- Change the size of the canvas
- Import new brushes, textures, shapes, etc.
- Change the graphics of brushes controllers
As soon as you press "stop", the recording will be stopped and will automatically switch to the playback mode.
Play Mode:
- Check button "Create new canvas on start". When enabled, when you start the script, a new document of original size will be created automatically.
- Check button "Relative to canvas size". If the current size of the canvas coincides with the size of the canvas at the time of recording, this option will not affect anything.
However, if the current canvas has a different size, the brush stroke coordinates will be automatically scaled. For example, if during the record the canvas size was 1000x1000 pixels, you can play the script on canvas size 5000x5000 and eventually get your picture picture 5 times enlarged without loss of quality. Of course, you will not get a 100% match with the original picture, since many parameters of the brush depend on its size.
- Check button "Remember randoms". When enabled, Paintstorm tries to fully replicate the original picture. If the current size of the canvas coincides with the original, it is possible to achieve almost 100% match.
- Check button "Pause on brush reset". Before the brush draws the first stroke, its parameters are reset to the starting values. This will be usefull to easily change the parameters of the brush to have some tests. For example, you draw a sketch, but the strokes seem too fat, and you would like to redraw the sketch with thinner lines. In this case you can change the brush size as well as any other parameters during script Playback when pressed Pause.
- "Step back" button is used to unwind script back safely. You can also use the Undo, however this may affect the script continuity that will lead to an unexpected result during the Playback.
How to record a script in several steps?
- One script file can contain only a single recording session.
1) Create a new canvas
2) Turn the script record on
3) Press stop, when you finished your drawing
4) Save your picture and save the script with a new file name. Now you can close Paintstorm if neccessary
5) To continue from the point at which you have finished, upload your picture and proceed further staring with step 2.
6) As a result, you get several script files. If you want to get the whole drawing process of your upload scripts and play them one by one.
| Blur parameter | Manipulations with brushes |
| Brush settings overview |
Hairy brush mode |
| Symmetry demonstration and tutorial |
How to use GRAPHS |
| What is the SET OF FORMS and how to use it |
All about SCATTER |